안녕하세요.
이번 글에서는 chapter 14를 정리해보려고 합니다!
Chapter 14.1 예외처리의 기본
이번 챕터에서는 예외처리의 기본적인 내용에 대해서 다룬다.
예제 코드 1
#include <iostream>
#include <fstream>
#include <string>
using namespace std;

int findFirstChar(const char* string, char ch)
{
    for (std::size_t index = 0; index < strlen(string); ++index)
        if (string[index] == ch)
            return index;

    return -1;
}

double divide(int x, int y, bool& success)
{
    if (y == 0)
    {
        success = false;
        return 0.0;
    }

    success = true;
    return static_cast<double>(x) / y;
}

int main()
{
	bool success;
    double result = divide(5, 3, success);

    if (!success)
    {
        std::cerr << "Error" << std::endl;
    }
    else
    {
        cout << "Result is " << result << endl;
    }

    std::ifstream input_file("temp.txt");
    if (!input_file)
        std::cerr << "Cannot open file" << std::endl;

    return 0;
}
전통적인 C++ 방식의 예외처리를 보여주는 코드이다.
findFirstChar 함수를 보면, for문을 이용해서 string의 각 index를 확인하며 ch와 같은지를 확인한 후 같으면 index를 return 해주고, 아니면 -1을 return 해준다.
즉, 매칭되는 문자열이 있으면 -1이 아닌 0 이상의 index가 return되고, 매칭되는 문자열이 없다면 -1이 return 되는 logic이다.
divide 함수를 보면, x를 y로 나눠주는데, y가 0인 경우는 success에 false를 대입하고 0.0을 return 한다.
y이 0이 아니라면 실제 x / y 값을 return 해주는 방식이다.
그럼 왜 전통적으로는 이런 방식으로 코딩을 했는가? 라고 한다면,
1) 퍼포먼스 때문에,
2) 다른 대체할 수 있는 문법이 마땅치 않았기 때문이다.
예외처리 챕터에서 배울 내용인 throw, catch, try 방식은 이러한 코드를 대체하려고 하는 것은 아니다.
예를 들어, 게임에서 갑자기 유저가 예측할 수 없는 반응을 하더라도 게임 서버에서는 이를 처리해야 하기 때문에 이럴 때 사용하는 것이다.
예제 코드 2
#include <iostream>
#include <fstream>
#include <string>
using namespace std;

int main()
{
    try
    {
        //throw - 1.0;
        throw "My Error Message!";

        // 딱 맞는 타입이 없는 경우 캐스팅을 하지 않고 runtime error를 내버린다 라는걸 기억해야 함.
    }
    catch (int x)
    {
        cout << "Catch integer " << x << endl;
    }
    catch (double x)
    {
        cout << "Catch double " << x << endl;
    }
    catch (const char* error_message)
    {
        cout << "Char * " << error_message << endl;
    }
    catch (std::string error_message)
    {
        cout << error_message << endl;
    }

    return 0;
}

이번 예제 코드에서 알아야할 내용은,
1) try, throw, catch의 구동 로직
2) 자료형 관련 이슈 이다.
우선, 예외처리를 적용해 주려면 try로 묶어줘야 하고 try로 묶여 있는 부분은 실제 코드가 실행되는 영역이다.
throw는 문제가 발생하는 경우 어떤 에러를 던져주는 역할을 한다.
catch는 throw가 던져준 에러를 받는 역할을 한다.
예를 들어서, input으로 받은 값이 특정 값보다 작은 경우 에러를 내고 싶다고 한다면 if (x > 1) throw "Error";와 같은 방식으로 설계할 수 있는 것이다.
위 예제 코드를 보면, catch 부분에서 굉장히 다양한 자료형을 받고 있는 것을 볼 수 있다.
try throw catch 방식의 예외처리는 throw 쪽에서 던진 에러의 자료형과 딱 맞는 타입이 catch에서 없는 경우 런타임 에러가 발생하고 예외처리가 작동하지 않는다.
위 예제 코드에서 보면 "My Error Message!"라는 에러를 throw 해주었는데, 이는 const char이기 때문에 const char를 argument으로 받는 부분에서 catch가 발생한다.
만약 throw -1.0; 으로 에러를 던져주면, catch에서 double을 argument로 받는 부분에서 에러를 캐치하게 된다.
이처럼 try throw catch 방식의 예외처리는 반드시 throw에서 던져주는 에러의 자료형과 catch에서 argument로 받을 때의 자료형이 매칭되어야만 사용이 가능하다.
Chapter 14.2 예외처리와 스택 되감기
이번 챕터에서는 여러 함수들이 서로를 호출하는 방식으로 stack을 쌓을 때 예외처리가 발생하는 경우에 대해서 알아본다.
예제 코드 1
#include <iostream>

// Stack unwinding.

using namespace std;


// exception specifier (int로 throw 할 수 있다.)
// throw(...) : 예외를 던질 가능성이 있는 함수다.
// throw() : 예외를 던지지 않는 함수다. 라는 의미.
void last() throw (int)
{
    cout << "last " << endl;
    cout << "Throws exception" << endl;

    throw - 1;
    //throw 'a';

    cout << "End last" << endl;
}

void third()
{
    cout << "Third" << endl;

    last();

    cout << "End third" << endl;
}

void second()
{
    cout << "Second" << endl;

    try
    {
        third();
    }
    catch (double)
    {
        cerr << "Second caught double exception" << endl;
    }

    cout << "End second" << endl;
}


void first()
{
    cout << "First" << endl;

    try
    {
        second();
    }
    catch (int)
    //catch (double)
    {
        cerr << "First caught int exception" << endl;
    }

    cout << "End first" << endl;
}


int main()
{
    cout << "Start " << endl;

    try
    {
        first();
    }
    catch (int)
    {
        cerr << "main caught int exception" << endl;
    }
    catch (...) // catch-all handler ellipsis
    {
        cerr << "main caught ellipses exception" << endl;
    }


    cout << "End main" << endl;
}
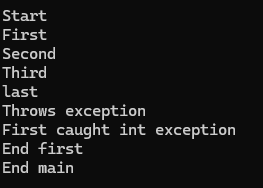
main문을 살펴보면,
Start를 cout 해주고, try에서 first() 함수를 실행해 준다.
first() 함수로 들어가 보면, First를 출력해 주고, try에서 second() 함수를 실행해 준다.
second()에서는 Second를 출력해 주고, third()를 실행해 준다.
third()에서는 Third를 출력해 주고, last()를 실행해 준다.
last()에서는 last와 Throws exception을 출력해 주고 throw -1;를 실행한다.
throw를 했으니, 이제 catch를 통해서 이를 잡아줘야 한다.
함수 스택이 차곡차곡 쌓여있기 때문에 뒤로 한 단계씩 돌아가야 하는데, 우선 third()에는 catch가 없고, second()에는 catch가 있지만 double을 받기 때문에 throw -1을 catch 할 수 없다.
더 돌아가면 first()가 있고, 여기에는 catch (int)가 있어서 잡아줄 수 있다.
그래서 출력 결과를 보면 First caught int exception이 출력된 것을 볼 수 있고, End first와 End main이 실행되었다.
이처럼 함수 스택을 뒤로 뒤로 돌아가는 것을 스택 언와인딩이라고 한다.
예제 코드 2
#include <iostream>

// Stack unwinding.

using namespace std;


// exception specifier (int로 throw 할 수 있다.)
// throw(...) : 예외를 던질 가능성이 있는 함수다.
// throw() : 예외를 던지지 않는 함수다. 라는 의미.
void last() throw (int)
{
    cout << "last " << endl;
    cout << "Throws exception" << endl;

    throw - 1;
    //throw 'a';

    cout << "End last" << endl;
}

void third()
{
    cout << "Third" << endl;

    last();

    cout << "End third" << endl;
}

void second()
{
    cout << "Second" << endl;

    try
    {
        third();
    }
    catch (double)
    {
        cerr << "Second caught double exception" << endl;
    }

    cout << "End second" << endl;
}


void first()
{
    cout << "First" << endl;

    try
    {
        second();
    }
    //catch (int)
    catch (double)
    {
        cerr << "First caught int exception" << endl;
    }

    cout << "End first" << endl;
}


int main()
{
    cout << "Start " << endl;

    try
    {
        first();
    }
    catch (int)
    {
        cerr << "main caught int exception" << endl;
    }
    catch (...) // catch-all handler ellipsis
    {
        cerr << "main caught ellipses exception" << endl;
    }


    cout << "End main" << endl;
}
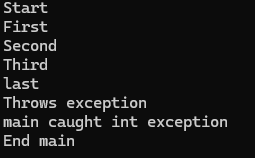
이번 코드에서는 first() 함수에서 catch (int)를 catch (double)로 만들었다.
예제 코드 1번에서는 throw -1;를 first() 함수에 있는 catch (int)를 통해서 받았는데, 받을 수 없도록 만든 것이다.
그럼 first()의 이전 스택인 main() 함수로 돌아가게 되고, main()에 있는 catch (...)에서 -1을 받을 수 있게 된다.
이전 챕터에서 다루었듯이 catch는 특정 자료형을 고정해서 받는 경우 자료형이 무조건 일치해야만 받을 수 있었는데, ellipsis를 사용하는 경우 어떤 자료형이든 받을 수 있다.
Chapter 14.3 예외 클래스와 상속
이번 챕터에서는 예외 클래스와 상속에 대해서 다룬다.
예제 코드 1
#include <iostream>

using namespace std;

class MyArray
{
private:
    int m_data[5];

public:
    // 클래스의 멤버 함수에서도 exception을 throw 할 수 있다.
    int& operator[] (const int& index)
    {
        if (index < 0 || index >= 5) throw - 1;
        return m_data[index];
    }
};

void doSomething()
{
    MyArray my_array;

    try
    {
        my_array[100];
    }
    catch (const int& x)
    {
        cerr << "Exception " << x << endl;
    }
}

int main()
{
    doSomething();
}
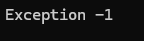
main 문을 살펴보면 doSomething();만 돌아가는 걸 알 수 있는데, my_array의 100번째 인덱스에 있는 element를 접근하는 코드를 동작시킨다.
MyArray class를 살펴보면, 연산자 오버로딩이 적용되어 있는데 index가 5를 넘는 경우 thorw -1;를 하도록 되어 있다.
이때 doSomething()에 있는 catch에서 -1을 잡게 되고, Exception이 출력되는 구조이다.
예제 코드 2
#include <iostream>

using namespace std;

class Exception
{
public:
    void report()
    {
        cerr << "Exception report" << endl;
    }
};


class ArrayException : public Exception
{
public:
    void report()
    {
        cerr << "Array Exception " << endl;
    }
};

class MyArray
{
private:
    int m_data[5];

public:
    // 클래스의 멤버 함수에서도 exception을 throw 할 수 있다.
    int& operator[] (const int& index)
    {
        //if (index < 0 || index >= 5) throw - 1;
        if (index < 0 || index >= 5) throw ArrayException();

        return m_data[index];
    }
};


void doSomething()
{
    MyArray my_array;

    try
    {
        my_array[100];
    }
    catch (const int& x)
    {
        cerr << "Exception " << x << endl;
    }
    catch (ArrayException& e)
    {
        cout << "doSomething()" << endl;
        e.report();
    }
    catch (Exception& e)
    {
        cout << "doSomething()" << endl;
        e.report();
    }
}


int main()
{

    try
    {
        doSomething();
    }
    catch (ArrayException& e)
    {
        cout << "main()" << endl;
        e.report();
    }
    catch (Exception& e)
    {
        cout << "main()" << endl;
        e.report();
    }

}
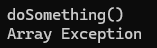
이번에는 MyArray에서 throw 할 때 -1을 던지지 않고, ArrayException() class의 임시 객체를 던지는 경우이다.
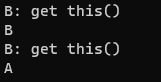
던진 임시 객체는 doSomething()에서 ArrayException 객체를 argument로 받는 catch에서 받게 된다.
주의해야 할 점은 doSomething()에서 catch의 순서가 만약 Exception이 ArrayException보다 먼저 있는 경우엔 Exception이 catch 한다는 점이다.
이는 다형성으로 인해, Exception이 catch 하는 부분에서도 ArrayException을 잡을 수 있기 때문이다.
예제 코드 3
#include <iostream>

using namespace std;

class Exception
{
public:
    void report()
    {
        cerr << "Exception report" << endl;
    }
};


class ArrayException : public Exception
{
public:
    void report()
    {
        cerr << "Array Exception " << endl;
    }
};

class MyArray
{
private:
    int m_data[5];

public:
    // 클래스의 멤버 함수에서도 exception을 throw 할 수 있다.
    int& operator[] (const int& index)
    {
        //if (index < 0 || index >= 5) throw - 1;
        if (index < 0 || index >= 5) throw ArrayException();

        return m_data[index];
    }
};


void doSomething()
{
    MyArray my_array;

    try
    {
        my_array[100];
    }
    catch (const int& x)
    {
        cerr << "Exception " << x << endl;
    }
    catch (ArrayException& e)
    {
        cout << "doSomething()" << endl;
        e.report();
        throw e; // re-throw
    }
    catch (Exception& e)
    {
        cout << "doSomething()" << endl;
        e.report();
    }
}


int main()
{

    try
    {
        doSomething();
    }
    catch (ArrayException& e)
    {
        cout << "main()" << endl;
        e.report();
    }
    catch (Exception& e)
    {
        cout << "main()" << endl;
        e.report();
    }

}

이전 예제와 다른 게 있다면, doSomething()의 ArrayException을 catch 하는 부분에서 throw e;를 추가했다.
이는 re-throw라는 기능으로, 해당 catch문에서 받은 ArrayException을 다시 던지게 된다.
에러가 발생했기 때문에, main문에 있는 ArrayException을 잡는 catch문으로 가게 된다.
예제 코드 4
#include <iostream>

using namespace std;

class Exception
{
public:
    void report()
    {
        cerr << "Exception report" << endl;
    }
};


class ArrayException : public Exception
{
public:
    void report()
    {
        cerr << "Array Exception " << endl;
    }
};

class MyArray
{
private:
    int m_data[5];

public:
    // 클래스의 멤버 함수에서도 exception을 throw 할 수 있다.
    int& operator[] (const int& index)
    {
        //if (index < 0 || index >= 5) throw - 1;
        if (index < 0 || index >= 5) throw ArrayException();

        return m_data[index];
    }
};


void doSomething()
{
    MyArray my_array;

    try
    {
        my_array[100];
    }
    catch (const int& x)
    {
        cerr << "Exception " << x << endl;
    }
    catch (Exception& e)
    {
        cout << "doSomething()" << endl;
        e.report();
        throw; // 그냥 튕겨보내는 느낌.
    }
}


int main()
{

    try
    {
        doSomething();
    }
    catch (ArrayException& e)
    {
        cout << "main()" << endl;
        e.report();
    }
    catch (Exception& e)
    {
        cout << "main()" << endl;
        e.report();
    }

}
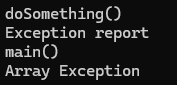
이번 코드에서 다른 점은, doSomething() 함수에서 ArrayException을 받은 게 아니라 Exception에서 catch를 하도록 했다.
따라서, doSomething()에서는 Exception 객체로 받은 상황이다. 이는 이전 예제 코드에서 언급했듯이, 다형성으로 인해 자식 클래스의 객체가 부모 클래스의 객체로도 잡을 수 있다.
그런데, throw e;를 하는 것과 다르게 그냥 throw;만 해주게 되면 catch문에서 받은 임시 객체를 바로 튕겨 보내는 역할을 해준다.
그래서 main문에서는 Exception으로 catch 하는 게 아니라 실제 객체의 클래스인 ArrayException으로 catch를 하게 된다.
Chapter 14.4 exception 소개
이번 챕터에서는 std library에 포함된 std::exception에 대해서 다룬다.
예제 코드 1
#include <iostream>
#include <exception>
#include <string>

int main()
{
    try
    {

        std::string s;
        s.resize(-1);
    }
    catch (std::exception& e)
    {
        std::cout << typeid(e).name() << std::endl; // exception 클래스의 자식들 중에서 std length error가 날라온 것이다.
        std::cerr << e.what() << std::endl; // string too long?
    }
}
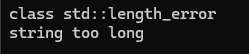
이전에 try, throw, catch 구조에서 catch에는 throw를 했을 때 받으려고 하는 자료형이 정확히 매칭될 때만 catch가 실행된다고 얘기했었다.
이번 코드에서는 어떤 특정 exception을 정의하는 것이 아니라, 예외가 발생했을 때 모든 exception을 catch 할 수 있도록 std::exception을 받도록 만들었다.
typeid를 통해서 실제로 어떤 에러가 발생했는지 확인할 수 있으며, e.what()을 이용하면 설명도 확인할 수 있다.
e.what()을 찍어보았을 때 string too long이라는 에러 문구를 확인할 수 있는데, 이는 다음과 같다.
s.resize() 함수의 인자는 unsigned(부호 없는) 타입이다. 여기에 signed int -1을 전달하게 되면, 암시적으로 부호 없는 타입으로 변환되면서, 해당 타입이 표현할 수 있는 최댓값인 2^32 - 1이 된다.
그런데 std::string 객체가 가질 수 있는 최대 길이가 2^31-1이다.
따라서 std::string이 가질 수 있는 최대 길이를 넘어선 요청이 들어온 것이기 때문에, string이 너무 길다는 에러가 발생한 것이다.
예제 코드 2
#include <iostream>
#include <exception>
#include <string>

int main()
{
    try
    {

        std::string s;
        s.resize(-1);
    }

    catch (std::length_error& e)
    {
        std::cerr << "Length error" << std::endl;
        std::cerr << e.what() << std::endl;
    }

    catch (std::exception& e)
    {
        std::cout << typeid(e).name() << std::endl; // exception 클래스의 자식들 중에서 std length error가 날라온 것이다.
        std::cerr << e.what() << std::endl; // string too long?
    }
}
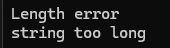
이번에는 catch에서 std::length_error를 받도록 만들어두었다.
이전 챕터에서도 언급했듯이, try catch문은 순차적으로 catch 문의 조건에 걸리는지를 확인한다.
따라서, 지금과 같은 코드에서는 catch (std::length_error)에 먼저 걸리게 되면서, Length error가 출력된 것을 확인할 수 있다.
이처럼 catch 하고 싶은 에러를 명시적으로 적어줘서 잡게 만드는 것도 가능하다.
예제 코드 3
#include <iostream>
#include <exception>
#include <string>

int main()
{
    try
    {
        throw std::runtime_error("Bad thing happend");
    }

    catch (std::length_error& e)
    {
        std::cerr << "Length error" << std::endl;
        std::cerr << e.what() << std::endl;
    }

    catch (std::exception& e)
    {
        std::cout << typeid(e).name() << std::endl; // exception 클래스의 자식들 중에서 std length error가 날라온 것이다.
        std::cerr << e.what() << std::endl; // string too long?
    }
}
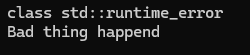
이번엔 특정 에러를 throw로 해서 던진 상황이다.
std::runtime_error를 발생시켰고, Bad thing happend라는 메시지를 담았다.
그랬더니 std::exception을 잡는 catch문에서 해당 에러를 잡아서 출력한 모습이다.
이처럼 throw 문에서 특정 에러를 발생시키게 만들 수 있고, catch 쪽에서 std::exception로 잡을 수 있다.
예제 코드 4
#include <iostream>
#include <exception>
#include <string>

class CustomException : public std::exception
{
public:
    // noexcept: 적어도 이 함수 안에서는 예외를 던지지 않는다 라는 의미.
    const char* what() const noexcept override
    {
        return "Custom exception";
    }
};


int main()
{
    try
    {
        throw CustomException();
    }

    catch (std::length_error& e)
    {
        std::cerr << "Length error" << std::endl;
        std::cerr << e.what() << std::endl;
    }

    catch (std::exception& e)
    {
        std::cout << typeid(e).name() << std::endl; // exception 클래스의 자식들 중에서 std length error가 날라온 것이다.
        std::cerr << e.what() << std::endl; // string too long?
    }
}

이번 코드에서는 std::exception을 상속해서 만든 CustomException 클래스에 대한 내용이다.
std::exception에서 e.what()을 통해 에러 메세지를 출력한 것처럼, custom exception class에서도 해당 기능을 할 수 있도록 만들려면 클래스 내에서 멤버 함수로 what() 함수를 오버라이드 해서 구현해주어야 한다.
그리고 what()에다가 noexcept라는 구문이 들어가는데, 이는 적어도 이 함수 안에서는 예외가 발생하지 않는다는 의미라고 한다.
Chapter 14.5 함수 try
이번 챕터에서는 함수 try(Function try)에 대해서 다룬다.
예제 코드 1
#include <iostream>

void doSomething()
// Function try
try
{
    throw - 1;
}
catch (...)
{
    std::cout << "Catch in doSomething()" << std::endl;
}


int main()
{
    try
    {
        doSomething();
    }
    catch (...)
    {
        std::cout << "Catch in main()" << std::endl;
    }
}

이번 예제 코드에서는 일반 함수에서 function try를 사용하는 경우이다.
함수에서 function try를 사용하는 경우는 단순히 인덴트만 바뀌는데, 우리가 원래 알던 대로 작동한다고 한다.
try에서 throw -1;를 하고 있어서, doSomething() 안에 있는 catch 쪽에서 이를 잡아주는 모습이다.
예제 코드 2
#include <iostream>

class A
{
private:
    int m_x;
public:
    A(int x) : m_x(x)
    {
        if (x <= 0)
            throw 1;
    }
};

class B : public A
{
public:

    B(int x)
        : A(x)
    {
    }
};

int main()
{
    try
    {
        B b(0);
    }
    catch (...)
    {
        std::cout << "Catch in main()" << std::endl;
    }
}
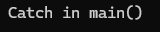
이번 예제에서는 class B의 인스턴스 b를 만들어주고, 생성자에서 0을 넣어서 만들어준 모습이다.
그런데 class B의 부모 클래스인 class A를 보면, x가 0보다 작거나 같을 때는 에러를 throw 하도록 되어 있다.
따라서 b를 만드는 과정에서 에러가 발생하게 되고, 발생한 에러는 main문에 있는 catch에서 잡아주게 된다.
예제 코드 3
#include <iostream>

class A
{
private:
    int m_x;
public:
    A(int x) : m_x(x)
    {
        if (x <= 0)
            throw 1;
    }
};

class B : public A
{
public:

    B(int x) try : A(x)
    {

    }
    catch (...)
    {
        std::cout << "Catch in B constructor" << std::endl;
        // throw;
    }

};

void doSomething()
// Function try
try
{
    throw - 1;
}
catch (...)
{
    std::cout << "Catch in doSomething()" << std::endl;
}


int main()
{
    try
    {
        B b(0);
    }
    catch (...)
    {
        std::cout << "Catch in main()" << std::endl;
    }
}
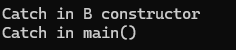
이번 예제 코드에서는, class B의 member initializer list에 try를 추가한 경우이다.
부모 클래스인 A의 생성자가 실행되는 과정에서 throw 1;로 인해 예외가 발생하는데, 이에 대한 예외를 class B의 생성자 내에서 catch 할 수 있게 된다.
근데 특이한 것은, B의 생성자 내에서 catch를 하고 나서 끝나는 것이 아니라, 추가로 main 문에서도 예외가 catch 된다.
즉, 이전 강의들에서 다루었던 re-throw 기능이 포함되어 있는 것이다.
Chapter 14.6 예외처리의 위험성과 단점
이번 챕터에서는 예외처리의 위험성과 단점에 대해서 알아본다.
예제 코드 1
#include <iostream>
#include <memory>

int main()
{
    try
    {
        int* i = new int[1000000];
        unique_ptr<int> up_i(i); // 영역을 벗어나면 유니크 포인터가 메모리를 지워줌.

        throw "error";

        //delete[] i;
    }
    catch (...)
    {
        cout << "Catch" << endl;
    }
}

위 main문처럼, 만약 동적 할당으로 변수를 선언했는데 이를 delete 하지 못하고 error를 throw 하는 경우, delete를 처리하지 못해 메모리 누수가 발생할 수 있다.
이럴 때 대응할 수 있도록 사용하는 것이 바로 스마트포인터로, 영역을 벗어나는 경우 메모리를 지워주는 기능을 한다.
스마트포인터는 추후 강의에서 자세하게 다룬다고 한다.
예제 코드 2
#include <iostream>
#include <memory>

using namespace std;

class A
{
public:
    ~A()
    {
        // Destructor에서는 예외를 못 던지게 되어 있음.
        // 보통 소멸자는 메모리에 있는 것을 지우고 날려보내는 것이라서 예외를 던질 수 있는 상태가 아니라고 봄.
        throw "error";
    }
};

int main()
{
    // 가급적 바깥쪽에서 사용할 것. 반복문에서는 사용 지양.
    // 모든 오류를 다 예외처리로 잡으려고 하지 말 것.
    // 정상적으로 작동해야 하는 것은 작동하도록 if문 같은 걸로 걸러내는게 좋음.
    // 사용자 입력의 경우 사용자한테 정상적인 범위의 입력을 다시 입력하도록 유도하느게 정상적.
    // 네트워크 서버 돌릴 때, 분산 처리나 병렬 처리 작업을 할 때, 하드웨어 관련해서 작업할 때, IO 작업할 때 등등 예외가 발생할 수 있는 상황에서 예외처리를 활용한다.
    try
    {
        A a;
    }
    catch (...)
    {
        cout << "Catch" << endl;
    }
}

클래스 사용 시, 소멸자에서는 예외를 못 던지도록 되어 있다고 한다.
보통 소멸자는 메모리에 있는 것을 지우고 날려 보내는 기능을 하기 때문에, 예외를 던질 수 있는 상태가 아니라고 본다고 한다.
그래서 소멸자에서 throw를 선언하는 경우 Warning이 발생한다.
예외 처리 초반 강의에서도 언급했지만, 예외 처리는 시간이 오래 소요되기 때문에 반복문에서 사용하기보다는 main문 바깥쪽에서 사용해서 반복 실행 되는 구간에서의 사용을 지양하는 것이 원칙이다.
그리고 모든 오류를 다 예외처리로 잡으려고 하면 안 되며, 진짜 예외적인 케이스들(네트워크 서버, 분산 처리 및 병렬 처리 시, 하드웨어 관련 작업, 입출력 작업할 때 등 예외가 발생할 수 있는 상황)에서만 예외 처리를 활용하는 것이 좋다고 한다.
여기까지 예외처리에 대해서 다룬 Chapter 14를 모두 정리해 보았다.
'C++ > 따라하며 배우는 C++' 카테고리의 다른 글
| 홍정모의 따라하며 배우는 C++ - Chapter 13 (0) | 2025.11.20 |
|---|---|
| 홍정모의 따라하며 배우는 C++ - Chapter 12 (0) | 2025.11.12 |
| 홍정모의 따라하며 배우는 C++ - Chapter 11 (0) | 2025.10.21 |
| 홍정모의 따라하며 배우는 C++ - Chapter 10 (1) | 2025.10.10 |
| 홍정모의 따라하며 배우는 C++ - Chapter 9 (0) | 2025.09.27 |